◆ ESSAY
Cargo.toml
[package]
name = "consolelog"
version = "0.1.0"
edition = "2021"

[lib]
crate-type = ["cdylib", "rlib"]

[dependencies]
wasm-bindgen = "0.2.74"
web-sys = { version = "0.3.56", features = ['console'] }
lib.rs
use wasm_bindgen::prelude::*;
#[wasm_bindgen]
extern {
// js_namespace는 console을 할당했다.
// 즉 log만 쓰면 console.log가 된다.
#[wasm_bindgen(js_namespace = console)]
fn log(s: &str);
// 여기는 console.log
#[wasm_bindgen(js_namespace=console, js_name=log)]
fn log_u32(a: u32);
// 여기도 console.log
#[wasm_bindgen(js_namespace=console, js_name=log)]
fn log_strings(a: &str, b: &str);
}
macro_rules! console_log {
// log 함수랑 연결된다.
($($t:tt)*) => (log(&format_args!($($t)*).to_string()))
}
// rust extern으로 하는 방법
fn rust() {
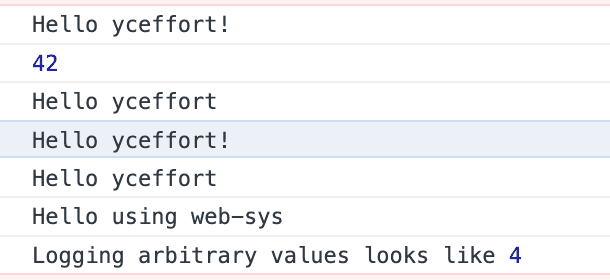
log("Hello yceffort!");
log_u32(42);
log_strings("Hello", "yceffort")
}
// macro
fn using_macro() {
console_log!("Hello {}!", "yceffort");
console_log!("Hello yceffort");
}
// websys library
fn using_web_sys() {
use web_sys::console;
console::log_1(&"Hello using web-sys".into());
let js: JsValue = 4.into();
console::log_2(&"Logging values are".into(), &js);
}
#[wasm_bindgen(start)]
pub fn run() {
rust();
using_macro();
using_web_sys();
}
Cargo.toml
[package]
name = "without-bundler"
version = "0.1.0"
edition = "2021"

[lib]
crate-type = ["cdylib"]

[dependencies]
wasm-bindgen = "0.2.79"

[dependencies.web-sys]
version = "0.3.4"
features = [
  'Document',
  'Element',
  'HtmlElement',
  'Node',
  'Window',
]
lib.rs
use wasm_bindgen::prelude::*;
#[wasm_bindgen(start)]
pub fn main() {
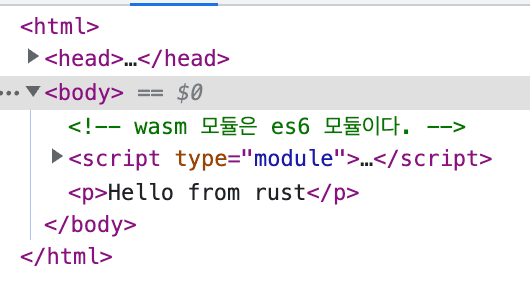
let window = web_sys::window().expect("there is no window in global");
let document = window.document().expect("there is no document in window");
let body = document.body().expect("there is no body in a document");
let p_element = document.create_element("p").expect("fail to create P element");
p_element.set_inner_html("Hello from rust");
body.append_child(&p_element).expect("fail to append element");
}
#[wasm_bindgen]
pub fn add(a: u32, b: u32) -> u32 {
a + b
}
가령 자바스크립트에 아래와 같은 코드가 있다고 가정해보자.
defined-in-js.js
export function name() {
  return 'Rust'
}

export class MyClass {
  constructor() {
    this._number = 42
  }

  get number() {
    return this._number
  }

  set number(n) {
    return (this._number = n)
  }

  toString() {
    return `My number is: ${this.number}`
  }
}
위 코드를 rust에서 실행하기 위해서는 먼저 해당 js코드를 추상화하는 작업이 필요하다. 위 코드에 대한 추상화는 아래와 같이 작업하면 된다.
use wasm_bindgen::prelude::*;
#[wasm_bindgen(module = "/defined-in-js.js")]
extern "C" {
// name 함수 정의
fn name() -> String;
// 클래스 정의
type MyClass;
// 클래스에 new keyword를 constructor로 정의
#[wasm_bindgen(constructor)]
fn new() -> MyClass;
// getter
#[wasm_bindgen(method, getter)]
fn number(this: &MyClass) -> u32;
// setter
#[wasm_bindgen(method, setter)]
fn set_number(this: &MyClass, number: u32) -> MyClass;
// toString
#[wasm_bindgen(method)]
fn toString(this: &MyClass) -> String;
}
// console.log를 정의한다.
#[wasm_bindgen]
extern "C" {
#[wasm_bindgen(js_namespace = console)]
fn log(s: &str);
}
#[wasm_bindgen(start)]
pub fn run() {
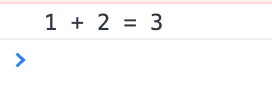
log(&format!("Hello from {}!", name())); // should output "Hello from Rust!"
// 클래스를 선언한다
let x = MyClass::new();
// 테스트 코드!
assert_eq!(x.number(), 42);
// setter에 숫자 주입
x.set_number(10);
// toString
log(&x.toString());
}
run() 함수 내부에 있는 것들이 순차적으로 실행될 것이다.
Hello from Rust!
My number is: 10