◆ ESSAY
Lighthouse는 웹사이트의 성능을 측정하는 유명한 도구중 하나다. 이 Lighthouse를 CI와 연동하여 수시로 웹사이트의 성능을 점검할 수 있도록 해보자.
일단 lighthouse-ci는 여기에서 확인할 수 있다.
설치
npm install -g @lhci/cli
루트 디렉토리에서 lighthouserc.js를 만들자. 여기가 설정이 들어가는 곳이다.
module.exports = {
  ci: {
    collect: {
      /* Add configuration here */
    },
    upload: {
      /* Add configuration here */
    },
  },
}
Lighthouse CI가 실행 될때마다, 서버가 구동되어 사이트가 시작되어야 한다. 이 서버가 작동하게되면, Lighthouse CI가 해당 서버를 토대로 웹사이트 성능을 추적할 것이다. 작업이 끝나면, 알아서 종료된다. 제대로 작동하기 위해서는 둘 중에 하나를 설정해둬야 한다.
staticDir: ci.collect에 해당 속성과 함께 static 파일이 위치한 곳을 설정해 두면된다. 그러면 Lighthouse CI는 알아서 그 파일을 기준으로 서버를 실행해서 테스트를 하게 된다.startServerCommand: static한 사이트가 아니라면, ci.collect에 서버를 키는 명령어를 적어두면 된다. (npm run start) 그러면 Lighthouse CI는 알아서 해당 명령어를 실행해서 서버를 키고, 끝난 후에는 종료 시킬 것이다.ci.collect.url에 Lighthouse CI가 조사해야 할 주소를 적어두면 된다. 값은 배열로 설정해야 하며, 이말인 즉슨 여러개의 사이트를 적어둘 수 있다는 뜻이다. 기본값으로 해당 주소를 각 3번씩 조사한다.
ci.upload.target에 temporary-public-storage로 설정해두자. Lighthouse CI가 조사한 결과 레포트를 해당 위치에 업로드 할 것이다. 이 결과는 최대 7일까지 유지되며 이후에는 자동으로 삭제된다. 자세한 내용은 여기를 확인하자.
ci.collect.numberOfRuns에 숫자를 넣어두면, 몇번을 실행할지 설정할 수 있다.
설정이 끝났다면 실행하자. lhci autorun 정상적으로 설정해두었다면, 아래와 같이 결과가 나타날 것이다.
module.exports = {
  ci: {
    collect: {
      url: ['http://localhost:3000'],
      collect: {
        numberOfRuns: 5,
      },
    },
    upload: {
      startServerCommand: 'npm run start',
      target: 'temporary-public-storage',
    },
  },
}
yceffort@yceffort yceffort-blog-v2 % lhci autorun
✅ .lighthouseci/ directory writable
✅ Configuration file found
✅ Chrome installation found
⚠️ GitHub token not set
Healthcheck passed!
Started a web server with "npm run start"...
Running Lighthouse 5 time(s) on http://localhost:3000
Run #1...done.
Run #2...done.
Run #3...done.
Run #4...done.
Run #5...done.
Done running Lighthouse!
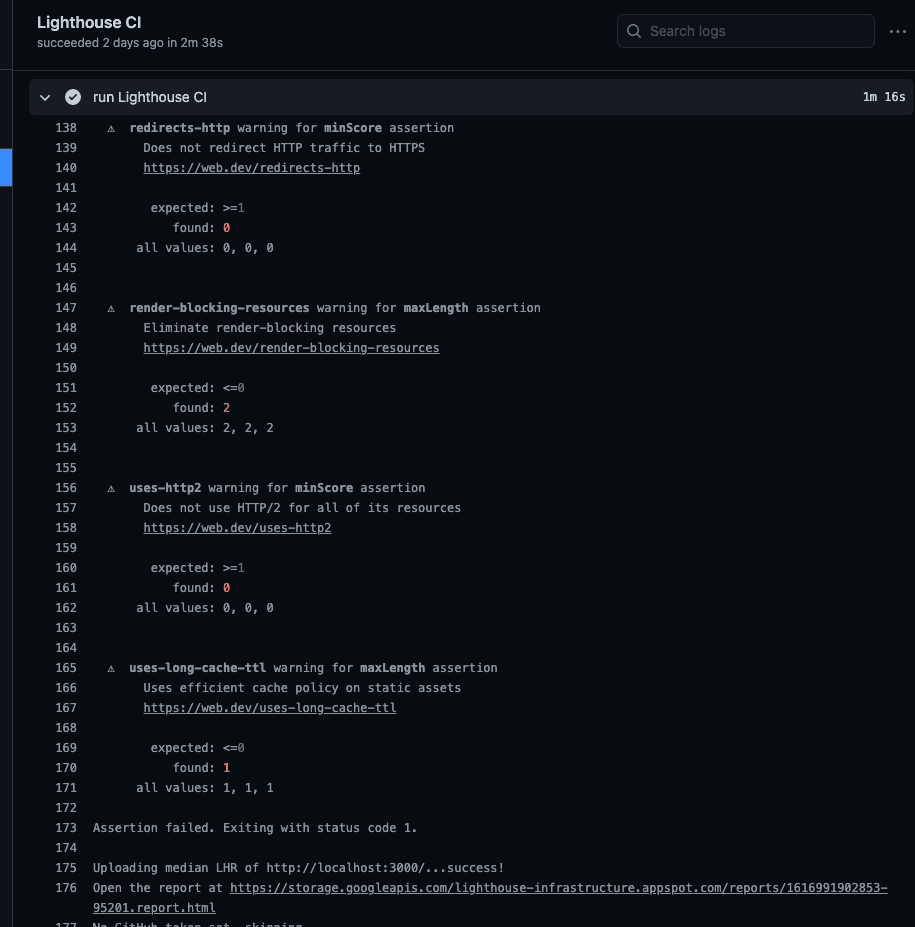
Uploading median LHR of http://localhost:3000/...success!
Open the report at https://storage.googleapis.com/lighthouse-infrastructure.appspot.com/reports/1617202753232-29187.report.html
No GitHub token set, skipping GitHub status check.
Done running autorun.
Lighthouse CI는 다양한 CI 툴과 연계할 수 있다. 여기를 참고하면 관련된 가이드를 참조할 수 있다.
또한 성능 모니터링에서 한 걸음 더 나아가서 사전에 정의된 기준을 충족하지 못하는 경우 빌드에 실패하게 만들 수 있다. 이는 assert를 이용해서 작업할 수 있다.
Lighthouse CI 에서는 세가지 단계로 검사할 수 있다.
off: 무시warn:error: 이 경우 0가 아닌 값으로 종료된다.module.exports = {
ci: {
collect: {
// ...
},
assert: {
assertions: {
'categories:performance': ['warn', {minScore: 1}],
'categories:accessibility': ['error', {minScore: 1}],
},
},
upload: {
// ...
},
},
}
나의 최애이자 유일신(?) 은 github action이기 때문에, 여기에 연동을 해보려고 한다. (oss님 제발...)
.github/workflows에 원하는 이름으로 파일을 만든다. 나는 lightouse-ci.yaml로 했다.
해당 파일 내용을 다음과 같이 꾸몄다.
name: Build project and run Lighthouse CI
on: [push]
jobs:
  lhci:
    name: Lighthouse CI
    runs-on: ubuntu-latest
    steps:
      - uses: actions/checkout@v1
      - name: Use Node.js 12.x
        uses: actions/setup-node@v1
        with:
          node-version: 12.x
      - name: npm ci
        run: |
          npm ci
      - name: run build
        run: npm run build-nextjs
      - name: run Lighthouse CI
        run: |
          npm install -g @lhci/cli@0.3.x
          lhci autorun --upload.target=temporary-public-storage || echo "LHCI failed!"
assert 를 추가
module.exports = {
  ci: {
    collect: {
      url: ['http://localhost:3000'],
      collect: {
        numberOfRuns: 5,
      },
    },
    upload: {
      startServerCommand: 'npm run start',
      target: 'temporary-public-storage',
    },
    assert: {
      preset: 'lighthouse:recommended',
    },
  },
}
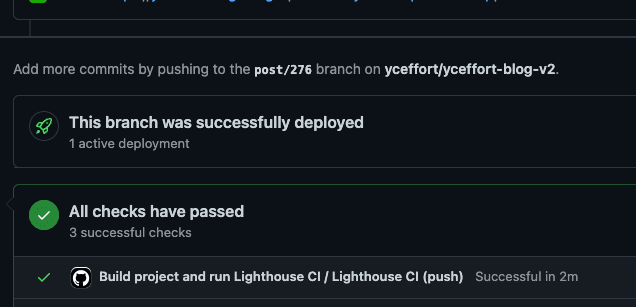
이제 코드를 푸쉬하면 아래와 같이 작동하는 것을 볼 수 있다.
https://github.com/yceffort/yceffort-blog-v2/pull/278
추가로 여기를 방문해서 app을 설치하고 레파지토리에 LHCI_GITHUB_APP_TOKEN를 키값으로 값을 추가해준다면, PR에 메시지도 남겨준다. 물론, secret 추가 이후에는 아까 만들었던 github action yaml 도 변경해주어야 한다.
- name: run Lighthouse CI
  env:
    LHCI_GITHUB_APP_TOKEN: ${{ secrets.LHCI_GITHUB_APP_TOKEN }}
  run: |
    npm install -g @lhci/cli@0.3.x
    lhci autorun --upload.target=temporary-public-storage || echo "LHCI failed!"
나름 블로그 최초 개설 시엔 신경을 썼었는데 시간이 지나고 이것저것 덕지덕지 붙으면서 점수가 점점 바닥으로 가고 있는 중이라는 것을 이제 알게 되었다. 🤪
여기서 개선은 모르겠고,,, 블로그 v3.0을 계획하고 있습니다. 블로그 v3.0 작업시에 lighthouse 점수를 수시로 확인하면서 작업을 해야겠다. 그리고 지금 내가 몸담고 있는 프로젝트에도 Lighthouse CI를 들이밀어 봐야겠다. 라이트하우스 함무바라 (점수보고) 디진다 퍼뜩 무봐라