- Published on
pytorch - Flower Classification
- Author

- Name
- yceffort
pytorch를 이용해서 꽃이미지를 구별해보도록 하자.
여기에서 활용할 데이터셋은 이거다. 총 102종류의 꽃이 있고, 각각 여러개의 이미지가 있다. 데이터셋을 다운로드 하면 train, valid, test로 나눠져 있고 이를 활용해서 꽃을 구별해보려고 한다.
1. 데이터 로딩
# 랜덤으로 학습하기 위해서 이미지를 약간씩 돌린다.
# 마찬가지로 랜덤하게 크롭한다.
# 또한 랜덤하게 상하 반전을 한다.
# 데이터를 텐서로 바꾼다.
# 이미지를 정규화 한다.
train_transforms = transforms.Compose([transforms.RandomRotation(30),
                                       transforms.RandomResizedCrop(224),
                                       transforms.RandomHorizontalFlip(),
                                       transforms.ToTensor(),
                                       transforms.Normalize([0.485, 0.456, 0.406],
                                                            [0.229, 0.224, 0.225])])

# validation과 test에는 랜덤을 적용하지 않는다.
# 리사이즈와, 가운데 크롭만 한다.
valid_transforms = transforms.Compose([transforms.Resize(256),
                                      transforms.CenterCrop(224),
                                      transforms.ToTensor(),
                                      transforms.Normalize([0.485, 0.456, 0.406],
                                                           [0.229, 0.224, 0.225])])

test_transforms = transforms.Compose([transforms.Resize(256),
                                      transforms.CenterCrop(224),
                                      transforms.ToTensor(),
                                      transforms.Normalize([0.485, 0.456, 0.406],
                                                           [0.229, 0.224, 0.225])])

# 이미지를 읽어드린후, 위에 메소드를 적용한다.
image_datasets = dict()
image_datasets['train'] = datasets.ImageFolder(train_dir, transform=train_transforms)
image_datasets['valid'] = datasets.ImageFolder(valid_dir, transform=valid_transforms)
image_datasets['test'] = datasets.ImageFolder(test_dir, transform=test_transforms)

# 배치로 만든다.
dataloaders = dict()
dataloaders['train'] = torch.utils.data.DataLoader(image_datasets['train'], batch_size=64, shuffle=True)
dataloaders['valid'] = torch.utils.data.DataLoader(image_datasets['valid'], batch_size=32)
dataloaders['test']  = torch.utils.data.DataLoader(image_datasets['test'], batch_size=20)
폴더에 숫자가 있는데, 해당 숫자가 어떤 꽃인지 매칭 해준다.
{
  "21": "fire lily",
  "3": "canterbury bells",
  "45": "bolero deep blue",
  "1": "pink primrose",
  "34": "mexican aster",
  "27": "prince of wales feathers",
  "7": "moon orchid",
  "16": "globe-flower",
  "25": "grape hyacinth",
  "26": "corn poppy",
  "79": "toad lily",
  "39": "siam tulip",
  "24": "red ginger",
  "67": "spring crocus",
  "35": "alpine sea holly",
  "32": "garden phlox",
  "10": "globe thistle",
  "6": "tiger lily",
  "93": "ball moss",
  "33": "love in the mist",
  "9": "monkshood",
  "102": "blackberry lily",
  "14": "spear thistle",
  "19": "balloon flower",
  "100": "blanket flower",
  "13": "king protea",
  "49": "oxeye daisy",
  "15": "yellow iris",
  "61": "cautleya spicata",
  "31": "carnation",
  "64": "silverbush",
  "68": "bearded iris",
  "63": "black-eyed susan",
  "69": "windflower",
  "62": "japanese anemone",
  "20": "giant white arum lily",
  "38": "great masterwort",
  "4": "sweet pea",
  "86": "tree mallow",
  "101": "trumpet creeper",
  "42": "daffodil",
  "22": "pincushion flower",
  "2": "hard-leaved pocket orchid",
  "54": "sunflower",
  "66": "osteospermum",
  "70": "tree poppy",
  "85": "desert-rose",
  "99": "bromelia",
  "87": "magnolia",
  "5": "english marigold",
  "92": "bee balm",
  "28": "stemless gentian",
  "97": "mallow",
  "57": "gaura",
  "40": "lenten rose",
  "47": "marigold",
  "59": "orange dahlia",
  "48": "buttercup",
  "55": "pelargonium",
  "36": "ruby-lipped cattleya",
  "91": "hippeastrum",
  "29": "artichoke",
  "71": "gazania",
  "90": "canna lily",
  "18": "peruvian lily",
  "98": "mexican petunia",
  "8": "bird of paradise",
  "30": "sweet william",
  "17": "purple coneflower",
  "52": "wild pansy",
  "84": "columbine",
  "12": "colt's foot",
  "11": "snapdragon",
  "96": "camellia",
  "23": "fritillary",
  "50": "common dandelion",
  "44": "poinsettia",
  "53": "primula",
  "72": "azalea",
  "65": "californian poppy",
  "80": "anthurium",
  "76": "morning glory",
  "37": "cape flower",
  "56": "bishop of llandaff",
  "60": "pink-yellow dahlia",
  "82": "clematis",
  "58": "geranium",
  "75": "thorn apple",
  "41": "barbeton daisy",
  "95": "bougainvillea",
  "43": "sword lily",
  "83": "hibiscus",
  "78": "lotus lotus",
  "88": "cyclamen",
  "94": "foxglove",
  "81": "frangipani",
  "74": "rose",
  "89": "watercress",
  "73": "water lily",
  "46": "wallflower",
  "77": "passion flower",
  "51": "petunia"
}
그리고 이번 분석에는 이미 만들어져 있는 모델을 사용하려고 한다. VGG16 이다.
2. VGG16
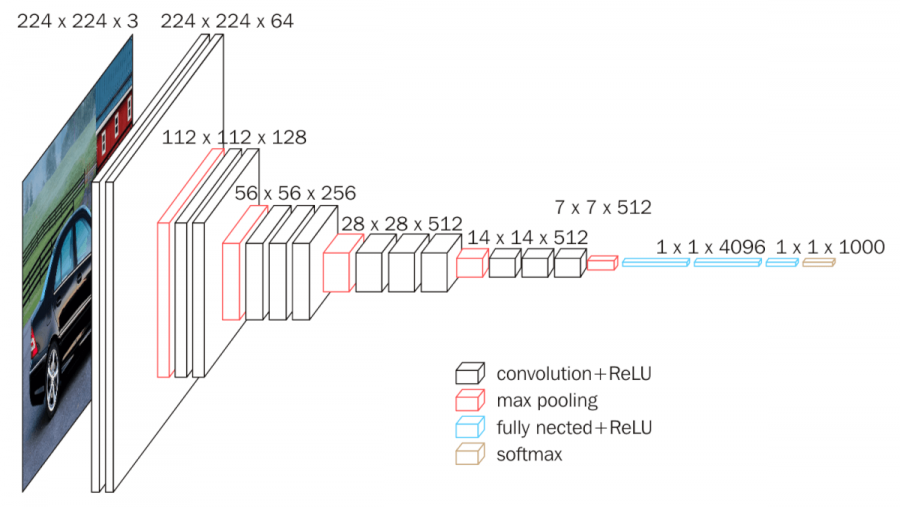
- 입력: 224*224 크기의 고정된 RGB 이미지
- 구조:
- Convoluitional Layer (3x3 filter, stride=1, padding=True)
- Max-Pooling Layer (2x2 filtter, stride=2)
- 1x1 Conv Layer (1x1 filter, stride=1)
- Fully Connected Layer (4096 > 4096 > 1000)
- 특징:
- 모든 레이어에 3x3 필터 적용
- 1x1 Conv Layer 사용
- 다섯장의 Max-Pooling Layer 사용
3. Classifier 만들기
output_size = len(cat_to_name)
vgg16_model = models.vgg16(pretrained=True)

# 244x244
input_size = vgg16_model.classifier[0].in_features

# 미리 만들어진 모델이라 적용할 필요 없음.
for param in vgg16_model.parameters():
    param.requires_grad = False
classifier = nn.Sequential(
    OrderedDict([
        ('fc1', nn.Linear(input_size, input_size // 8)),
        ('relu1', nn.ReLU()),
        ('droupout', nn.Dropout(p=0.20)),

        ('fc2', nn.Linear(input_size // 8, input_size // 32)),
        ('relu2', nn.ReLU()),
        ('droupout', nn.Dropout(p=0.20)),

        ('fc3', nn.Linear(input_size // 32, input_size // 128)),
        ('relu3', nn.ReLU()),
        ('droupout', nn.Dropout(p=0.20)),

        ('fc4', nn.Linear(input_size // 128, output_size)),
        ('softmax', nn.LogSoftmax(dim=1))
    ])
)

vgg16_model.classifier = classifier

device = torch.device("cuda" if torch.cuda.is_available() else "cpu")
epochs = 20
learning_rate = 0.001

criterion = nn.NLLLoss()
optimizer = optim.Adam(vgg16_model.classifier.parameters(), lr=learning_rate)
vgg16_model = vgg16_model.to(device)
오차 함수로는 NLLLoss를 Optimizer로 Adam을 사용하였다.
# epochs만큼 훈련
for e in range(epochs):
    running_loss = 0

    # 트레이닝 셋
    for index, (t_inputs, t_labels) in enumerate(dataloaders['train']):

        # cpu나 cuda로 변환
        t_inputs, t_labels = t_inputs.to(device), t_labels.to(device)

        optimizer.zero_grad()

        t_ouputs = vgg16_model.forward(t_inputs)
        loss = criterion(t_ouputs, t_labels)
        loss.backward()
        optimizer.step()

        # 오차 축적
        running_loss += loss.item()

        # 5번마다 validset으로 확인
        if (index + 1) % 5 == 0:
            # eval 모드로 변환
            vgg16_model.eval()
            v_loss = 0
            accuracy = 0

            # valid set
            for v_inputs, v_labels in dataloaders['valid']:

                v_inputs, v_labels = v_inputs.to(device), v_labels.to(device)
                optimizer.zero_grad()

                # 자동미분 off
                with torch.no_grad():
                    v_output = vgg16_model.forward(v_inputs)
                    loss = criterion(v_output, v_labels)
                    ps = torch.exp(v_output)
                    top_p, top_class = ps.topk(1, dim=1)
                    equals = top_class == v_labels.view(*top_class.shape)
                    accuracy += torch.mean(equals.type(torch.FloatTensor))

                vgg16_model.train()

            train_losses.append(running_loss / 5)
            valid_losses.append(loss / len(dataloaders['valid']))
            accuracies.append(accuracy / len(dataloaders['valid']))

            ## 결과 및 정확도 출력
            print_accuracy = "{:.5f}".format(accuracies[-1])

            if len(accuracies) >= 2:
                change = accuracies[-1] - accuracies[-2]
                if change > 0:
                    print_accuracy += '↑'
                elif change == 0 :
                    print_accuracy += '-'
                else:
                    print_accuracy += '↓'


            running_loss = 0

            print("Epoch: {}/{}".format(e+1, epochs),
                  "Training Loss: {:.5f}".format(train_losses[-1]),
                  "Valodation Loss: {:.5f}".format(valid_losses[-1]),
                  "Accuracy: {}".format(print_accuracy))
Epoch: 1/20 Training Loss: 4.69953 Valodation Loss: 0.21000 Accuracy: 0.02043
Epoch: 1/20 Training Loss: 4.53161 Valodation Loss: 0.19509 Accuracy: 0.06490↑
Epoch: 1/20 Training Loss: 4.50895 Valodation Loss: 0.19441 Accuracy: 0.09135↑
Epoch: 1/20 Training Loss: 4.22797 Valodation Loss: 0.20272 Accuracy: 0.13582↑
Epoch: 1/20 Training Loss: 4.13869 Valodation Loss: 0.21389 Accuracy: 0.17909↑
Epoch: 1/20 Training Loss: 3.75459 Valodation Loss: 0.20136 Accuracy: 0.19952↑
Epoch: 1/20 Training Loss: 3.63869 Valodation Loss: 0.19415 Accuracy: 0.24760↑
...
Epoch: 20/20 Training Loss: 0.36903 Valodation Loss: 0.00035 Accuracy: 0.89663↓
Epoch: 20/20 Training Loss: 0.53348 Valodation Loss: 0.00012 Accuracy: 0.91106↑
Epoch: 20/20 Training Loss: 0.50826 Valodation Loss: 0.00007 Accuracy: 0.90986↓
Epoch: 20/20 Training Loss: 0.36002 Valodation Loss: 0.00102 Accuracy: 0.90385↓
Epoch: 20/20 Training Loss: 0.58472 Valodation Loss: 0.00031 Accuracy: 0.90745↑
Epoch: 20/20 Training Loss: 0.50919 Valodation Loss: 0.00016 Accuracy: 0.91346↑
Epoch: 20/20 Training Loss: 0.49237 Valodation Loss: 0.00009 Accuracy: 0.91707↑
아쉽게도 8번 째 부터는 90% 벽을 넘지 못하고 계속 같은 수준에서 머물렀다.
Colab Notebook에서 돌렸는데, 이렇게 까지 오래 돌릴 필요가 있었나 싶을 정도로 오래 걸렸다. (4시간 정도)
vgg16_model.eval()

vgg16_model.to(device)
accuracy = 0
test_error = 0

for images, labels in dataloaders['test']:
  images, labels = images.to(device), labels.to(device)

  with torch.no_grad():
    output = vgg16_model.forward(images)

  test_error += criterion(output, labels).item()
  ps = torch.exp(output).data
  equal = Variable(labels.data == ps.max(1)[1]).float()
  accuracy += torch.mean(equal)


print("Test Error: {:.5f}".format(test_error/len(dataloaders['test'])))
print("Test Accuracy: {:.5f}".format(accuracy/len(dataloaders['test'])))
Test Error: 0.38797
Test Accuracy: 0.90456
90%의 정확도가 나왔다. 기초적인 것만 활용한 것 치고는 괜찮은 결과 였다.
# 이미지를 위에서 변환한 것 처럼 변환해 준다.
def process_image(image):
''' Scales, crops, and normalizes a PIL image for a PyTorch model,
returns an Numpy array
'''
image = Image.open(image)
transformer = transforms.Compose([transforms.Resize(256),
transforms.CenterCrop(224),
transforms.ToTensor(),
transforms.Normalize([0.485, 0.456, 0.406],
[0.229, 0.224, 0.225])])
return transformer(image)
# TODO: Process a PIL image for use in a PyTorch model
img_path = '/content/flowers/test/1/image_06743.jpg'
img = process_image(img_path)
img.shape
# 예측
def predict(image_path, model, topk=5):
''' Predict the class (or classes) of an image using a trained deep learning model.
'''
# eval, cpu모드로 전환
model.eval()
model.cpu()
image = process_image(image_path)
image = image.unsqueeze(0)
with torch.no_grad():
output = model.forward(image)
top_prob, top_labels = torch.topk(output, topk)
top_prob = top_prob.exp()
top_prob_array = top_prob.data.numpy()[0]
top_prob_array = list(map(lambda x: round(float(x), 5), top_prob_array))
class_to_idx = {v: k for k, v in model.class_to_idx.items()}
top_labels_data = top_labels.data.numpy()
top_labels_list = top_labels_data[0].tolist()
top_classes = [class_to_idx[x] for x in top_labels_list]
return top_prob_array, top_classes
# 이미지 보기
def imshow(image, ax=None, title=None):
"""Imshow for Tensor."""
if ax is None:
fig, ax = plt.subplots()
# PyTorch tensors assume the color channel is the first dimension
# but matplotlib assumes is the third dimension
image = image.numpy().transpose((1, 2, 0))
# Undo preprocessing
mean = np.array([0.485, 0.456, 0.406])
std = np.array([0.229, 0.224, 0.225])
image = std * image + mean
image = np.clip(image, 0, 1)
ax.imshow(image)
return ax
def check(image_path, image_label=None):
probs, classes = predict(image_path, vgg16_model)
class_names = [cat_to_name[x] for x in classes]
print('is this {}?'.format(class_names[0]))
if image_label:
print('this is {}.'.format(cat_to_json.get(classes[0])))
fig, ax = plt.subplots()
image_to_show = process_image(image_path)
imshow(image_to_show, ax, class_names[-1])
fig, ax = plt.subplots()
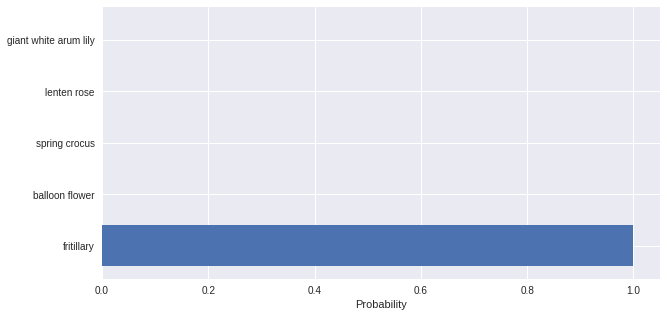
y_pos = np.arange(len(class_names))
plt.barh(y_pos, probs)
plt.yticks(y_pos, class_names)
plt.xlabel('Probability')
plt.show()
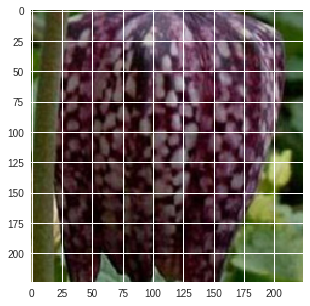
is this fritillary?
this is fritillary.